ReviewMaster AI: Getting Started Guide
Welcome to ReviewMaster AI, your comprehensive solution for managing Google Business reviews. This guide will walk you through all aspects of the platform, from initial setup to advanced features.
ReviewMaster AI helps businesses manage their online reviews with powerful AI-driven tools that save time and improve customer engagement. With our platform, you can:
- Efficiently manage reviews across multiple business locations
- Generate AI-powered responses with customizable tone and language
- Analyze review sentiment and identify trends
- Benchmark against competitors
- Discover key topics in your reviews
This guide will help you get started and make the most of all features available in ReviewMaster AI.
Screenshot: ReviewMaster AI dashboard overview
Account Setup
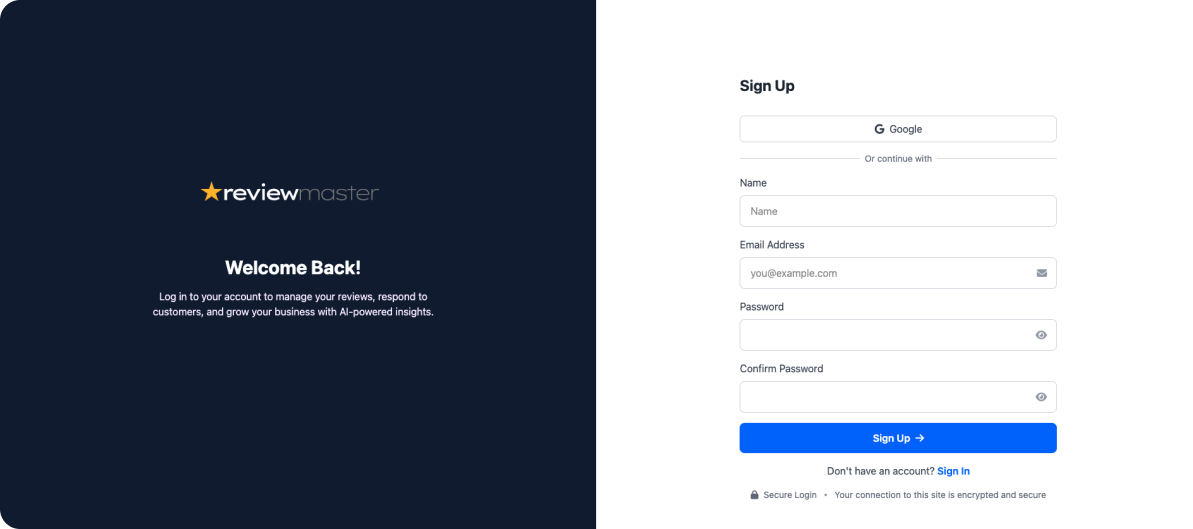
Creating Your Account
Getting started with ReviewMaster AI is simple:
- Visit the signup page
- Enter your email address and create a password
- Verify your email address through the confirmation link
- Complete your profile with your name and business information
Screenshot: Signup page with form fields
Selecting a Plan
ReviewMaster AI offers several plans to meet different business needs:
To select a plan:
- Navigate to the Plan Selection page after signup
- Review the features and pricing for each plan
- Select the plan that best fits your needs
- Enter payment information if selecting a paid plan
Screenshot: Plan selection page showing different options

Inviting Team Members
ReviewMaster AI allows you to collaborate with your team:
- Go to the Account tab and select "Team Management"
- Click "Invite Team Member"
- Enter the email address of the person you want to invite
- Select their role and permissions:
- Admin: Full access to all features
- Manager: Can manage reviews and view analytics
- Responder: Can only respond to reviews
- Click "Send Invitation"
Team members will receive an email invitation to join your ReviewMaster AI account.
Screenshot: Team invitation interface
Connecting Your Business
Google Business Profile Connection
To start managing your reviews, you need to connect your Google Business Profile:
- Navigate to the "Business Connect" page
- Click the "Connect with Google" button
- Sign in with the Google account that has access to your Google Business Profile
- Grant the necessary permissions when prompted
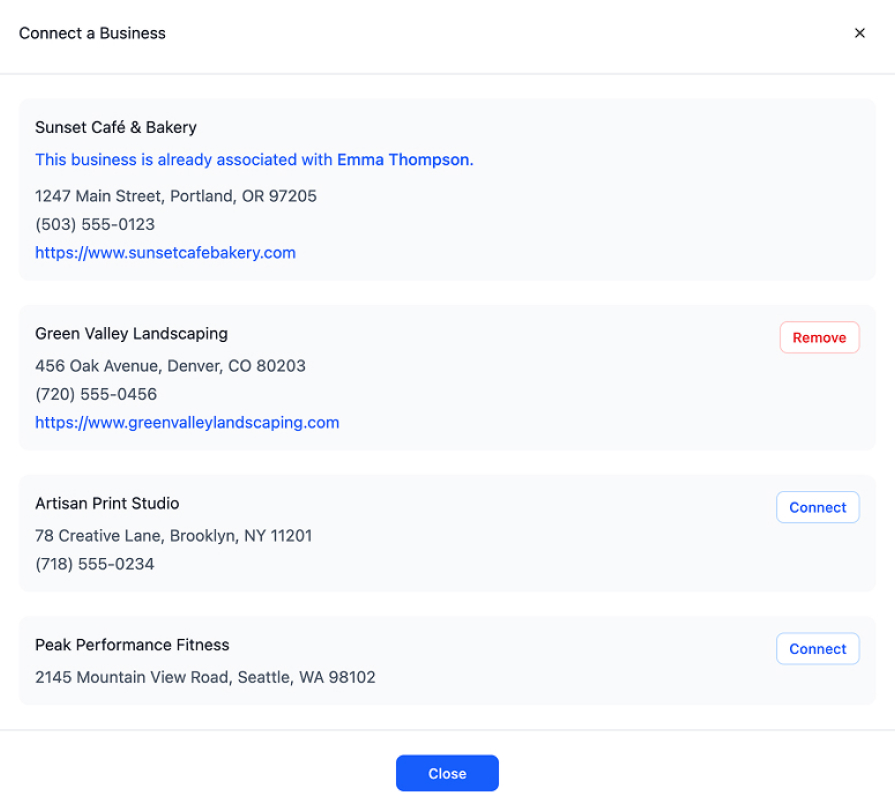
- Select the businesses you want to connect from the available list
- Click "Connect Selected Businesses" to complete the process
Screenshot: Google Business Profile connection process
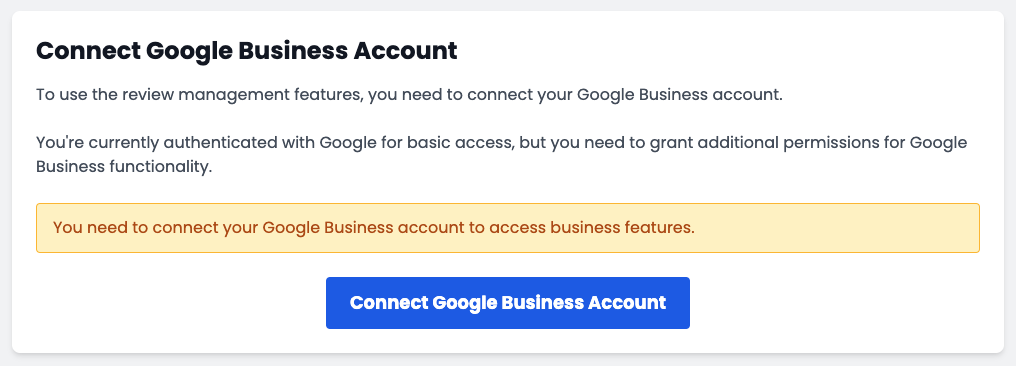
Note: You must be an owner or manager of the Google Business Profile to connect it to ReviewMaster AI.
Managing Multiple Businesses
If you have multiple business locations, ReviewMaster AI makes it easy to manage them all from a single dashboard:
- Connect each business as described above
- Use the business selector dropdown in the top navigation to switch between businesses
- All connected businesses will appear in the dropdown menu
- Select "All Businesses" to view aggregated data across all your locations
Screenshot: Business selector dropdown showing multiple locations
Troubleshooting Connection Issues
If you encounter issues connecting your business, here are some common solutions:
Business Already Connected Error
If you see an error stating that the business is already connected by another user:
- The business may already be connected to another ReviewMaster AI account
- Contact the account owner (their masked email will be displayed)
- Ask them to transfer ownership or add you as a team member
Screenshot: Business already connected error page
Permission Issues
If your business doesn't appear in the list of available businesses:
- Make sure you're signed in with the correct Google account
- Verify that you have owner or manager access to the Google Business Profile
- Try disconnecting and reconnecting your Google account
API Connection Errors
If you encounter API connection errors:
- Check your internet connection
- Clear your browser cache and cookies
- Try using a different browser
- Contact support if the issue persists
If you continue to experience issues, please contact our support team for assistance.
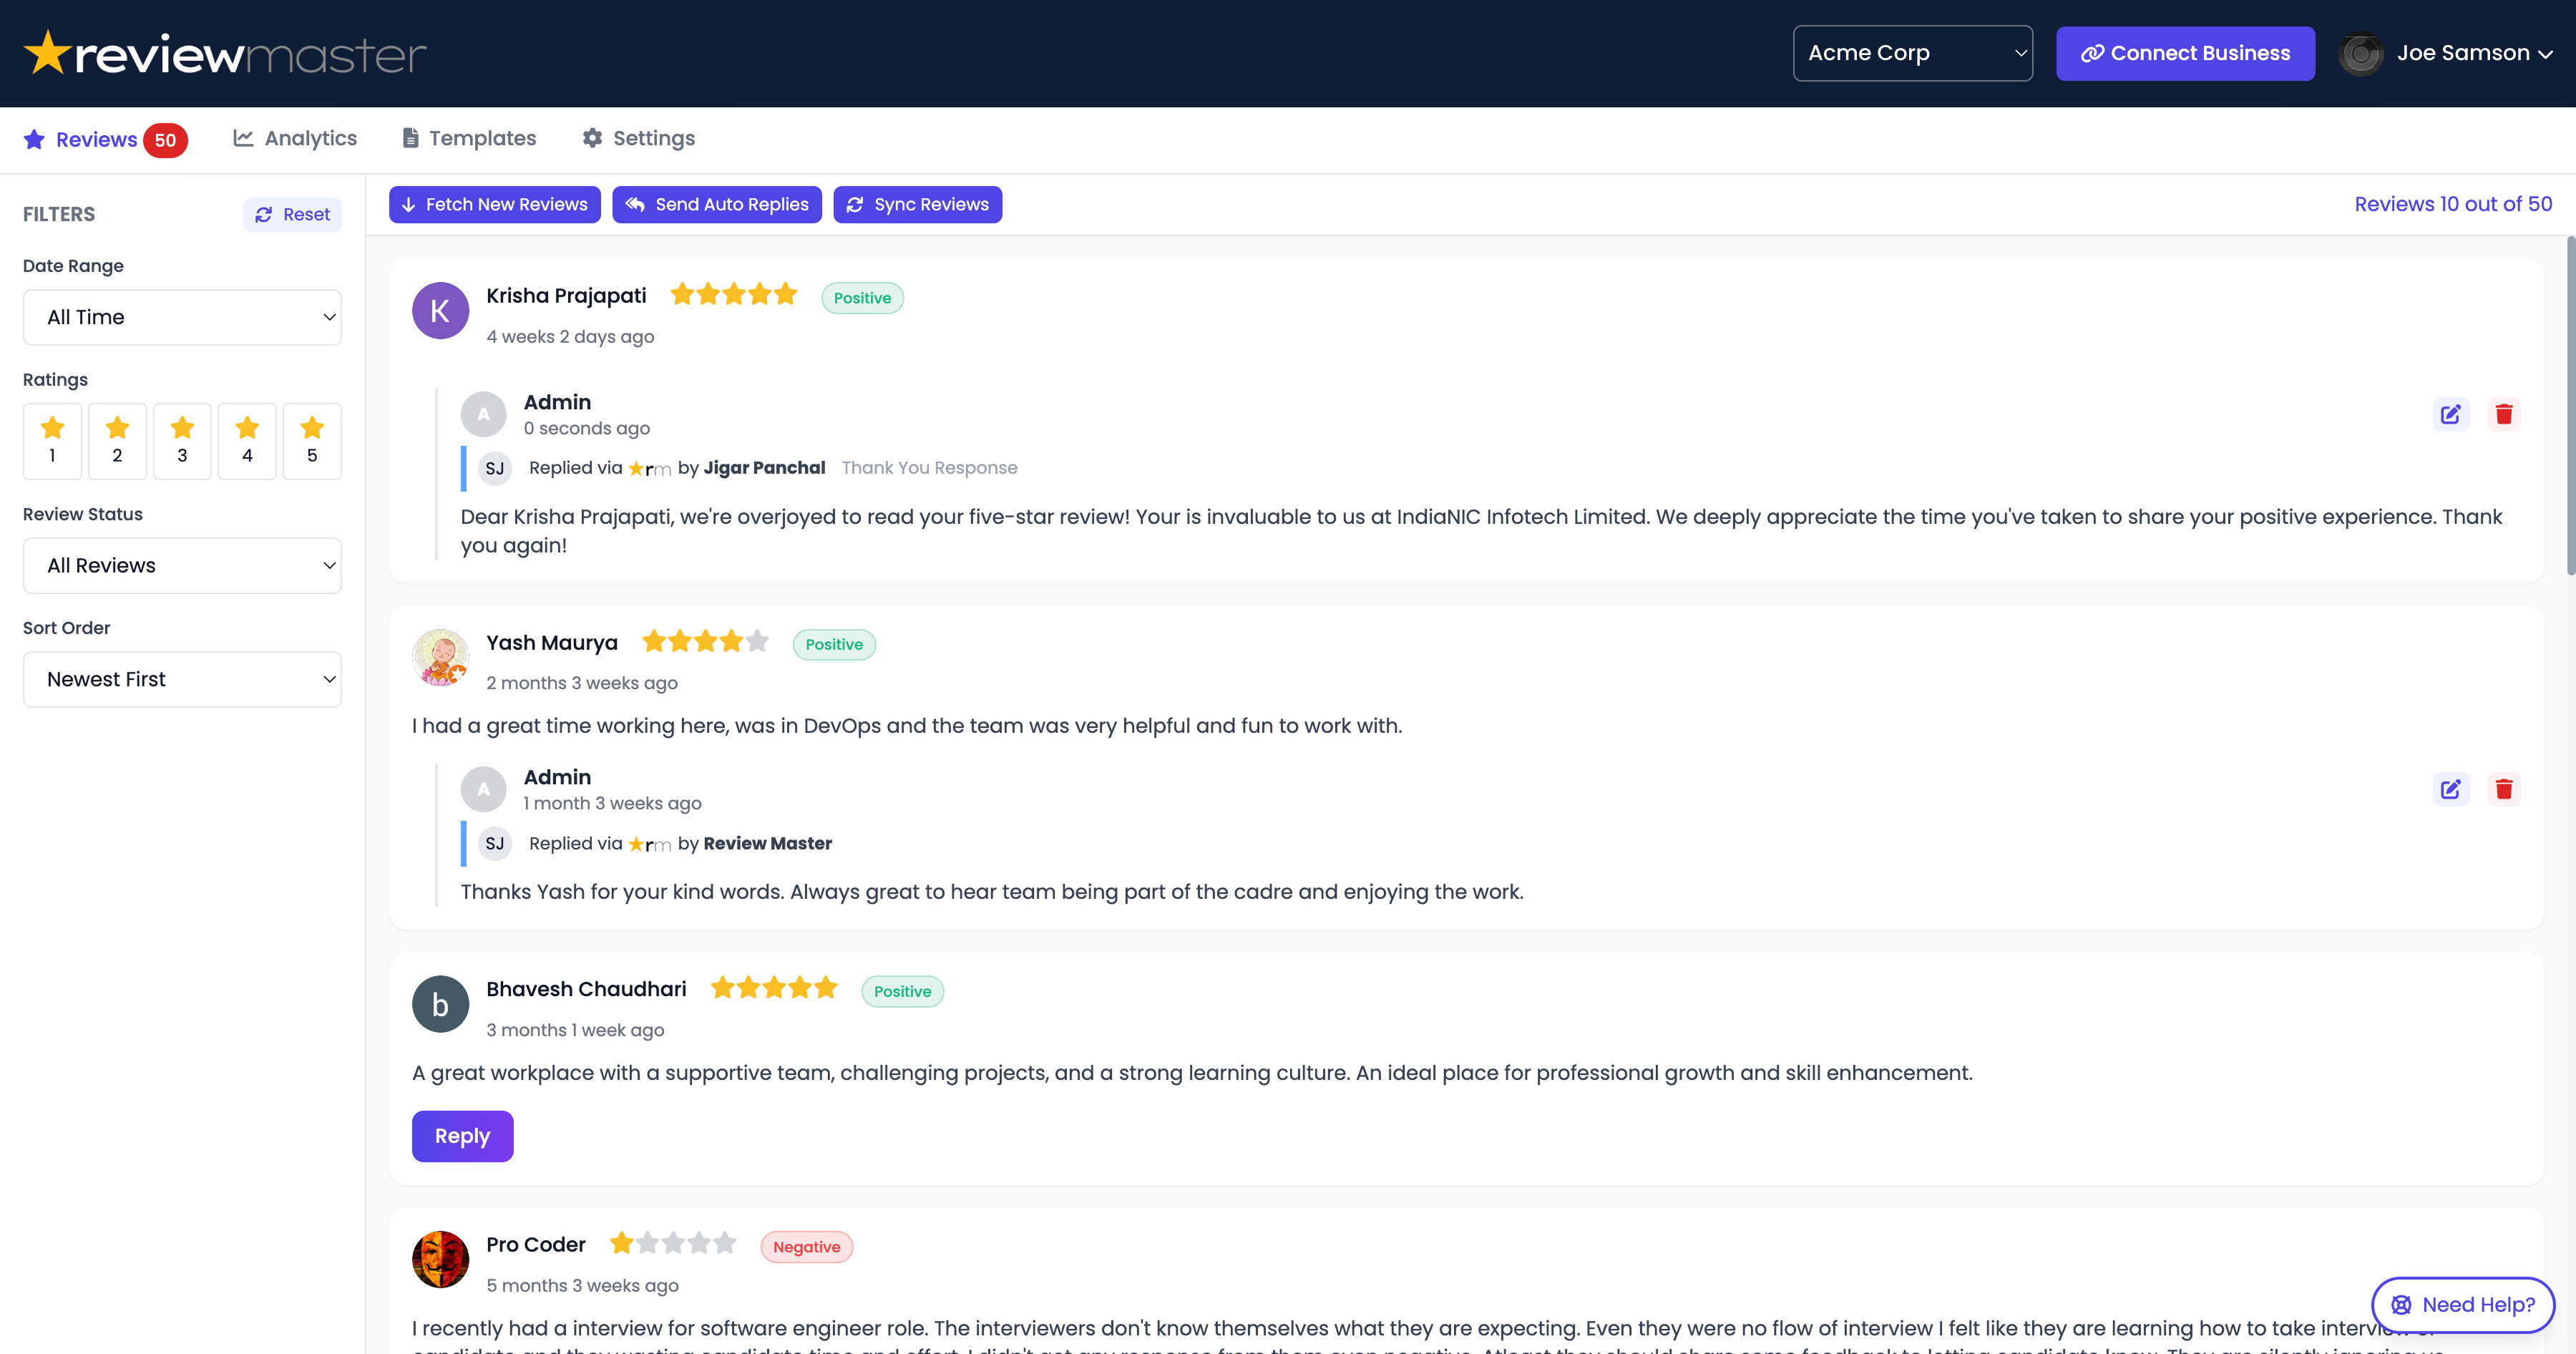
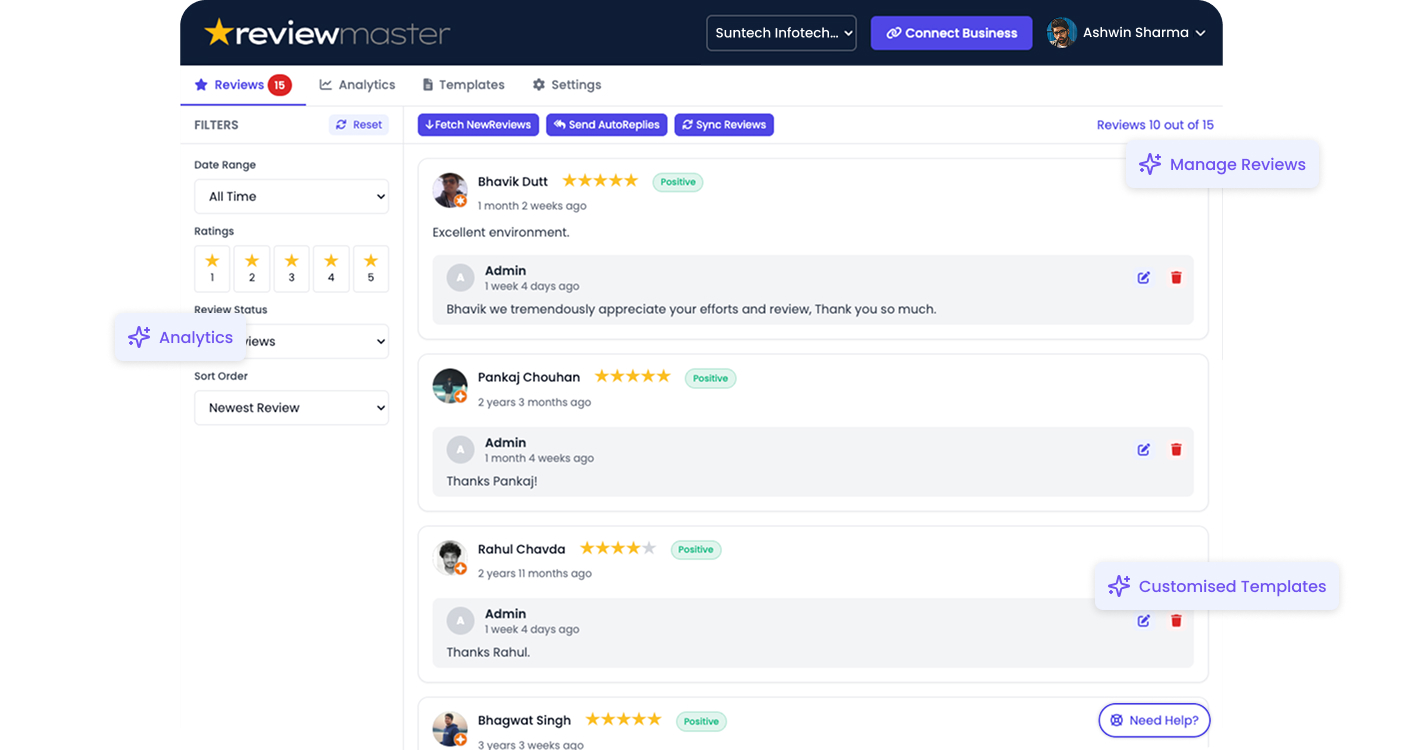
Managing Reviews
Viewing Your Reviews
Once you've connected your business, you can view all your reviews in the Reviews tab:
- Click on the "Reviews" tab in the main navigation
- All reviews for the selected business will be displayed
- Reviews are sorted by date by default, with the most recent at the top
- Each review shows the customer name, rating, date, and review text
Screenshot: Reviews tab showing list of reviews
Filtering and Sorting
ReviewMaster AI provides powerful filtering and sorting options to help you focus on the reviews that matter most:
Filter Options
- Rating: Filter by 1-5 stars
- Date Range: Last 7 days, 30 days, etc.
- Reply Status: Replied, Not Replied
- Keywords: Search for specific terms
Sort Options
- Date: Newest or Oldest first
- Rating: Highest or Lowest first
- Reply Status: Replied or Not Replied first
- Relevance: Based on keyword search
To apply filters or change sorting:
- Click on the "Filter" button above the reviews list
- Select your desired filters from the dropdown menu
- Click "Apply Filters" to update the reviews list
- Use the "Sort By" dropdown to change the sorting order
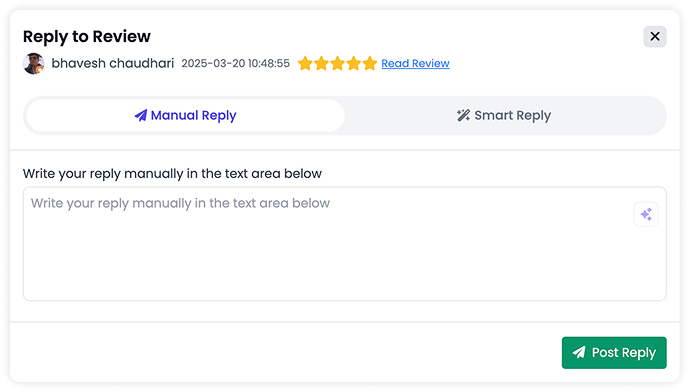
Responding to Reviews
Responding to reviews is easy with ReviewMaster AI:
- Find the review you want to respond to
- Click the "Reply" button below the review
- Type your response in the text box
- Click "Submit Reply" to publish your response
Best Practices for Responding to Reviews
- Respond promptly to all reviews, especially negative ones
- Thank the reviewer for their feedback
- Address specific points mentioned in the review
- Keep responses professional and courteous
- Offer solutions or next steps for negative reviews
- Invite the customer to contact you directly for further discussion
Screenshot: Review reply interface
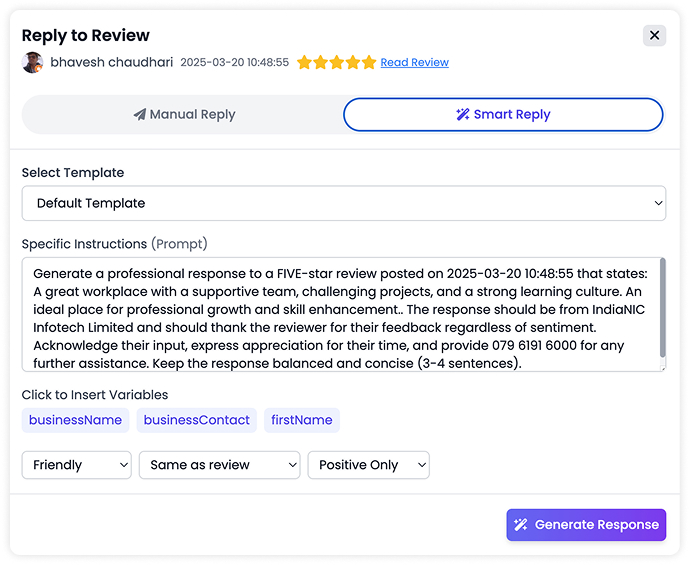
Using AI-Powered Responses
ReviewMaster AI's most powerful feature is its ability to generate intelligent, personalized responses to reviews:
- Find the review you want to respond to
- Click the "AI Reply" button
- Select your preferred tone (Professional, Friendly, Enthusiastic, etc.)
- Choose the language for the response
- Click "Generate Response"
- Review the AI-generated response
- Edit the response if needed
- Click "Submit Reply" to publish
Pro Tip: You can customize the AI's response style in the Settings tab to match your brand voice and ensure consistency across all your review responses.
Screenshot: AI response generation interface
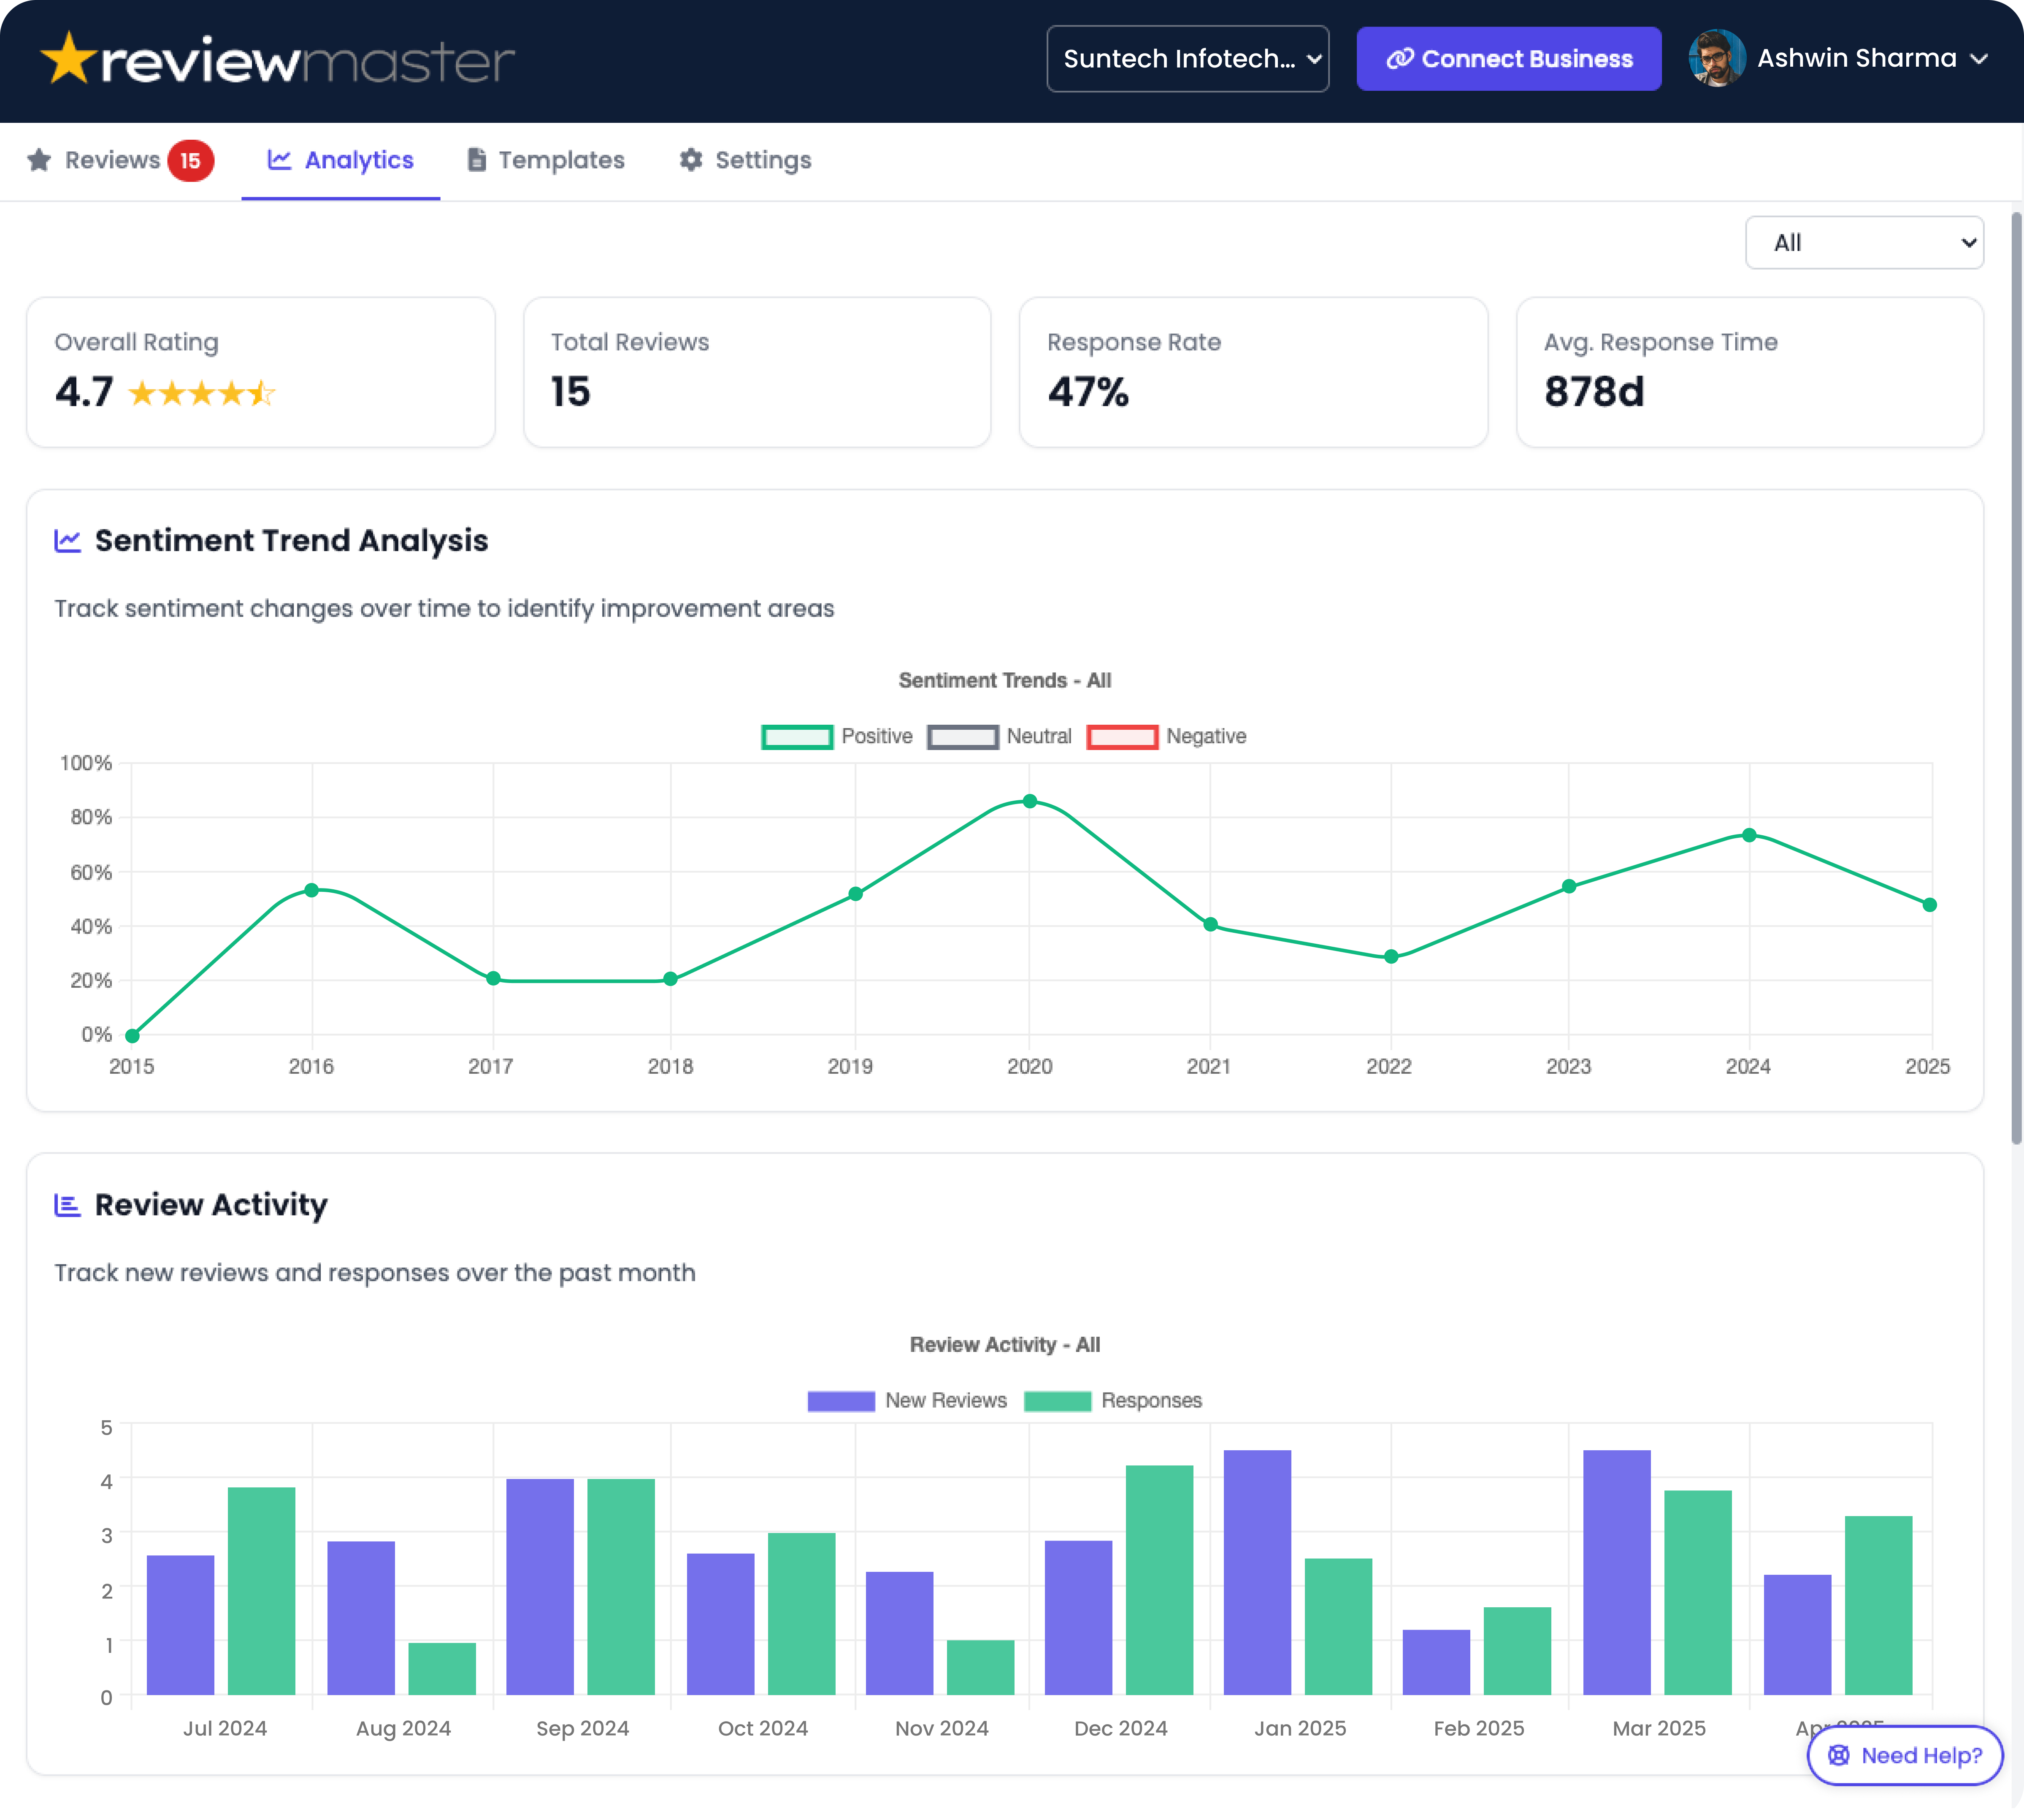
Analytics Dashboard
The Analytics Dashboard provides valuable insights into your reviews and customer sentiment. Here's what you can find in this section:
Rating Trends
Track how your average rating changes over time. Identify patterns and seasonal trends in customer satisfaction.
Screenshot: Rating trends chart

- Average rating over time
- Rating distribution
- Customizable date ranges
Sentiment Analysis
Understand the emotional tone of your reviews beyond just star ratings. Our AI analyzes review text to identify positive, negative, and neutral sentiments.
Screenshot: Sentiment analysis breakdown
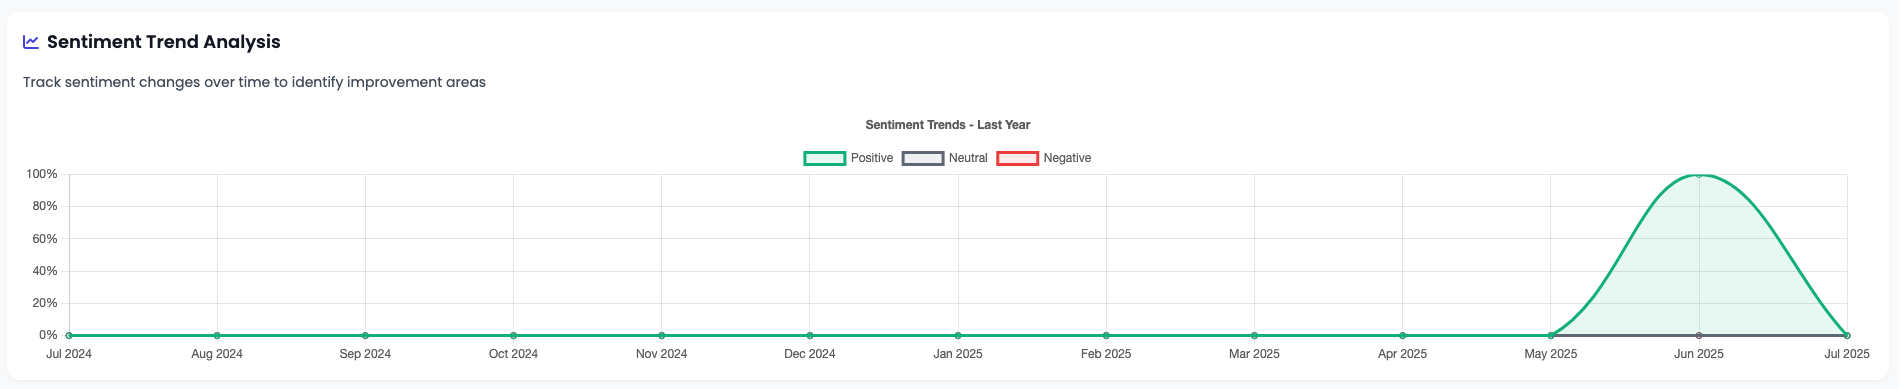
- Sentiment breakdown
- Sentiment trends over time
- Emotional analysis
Pro Tip: Use the insights from your Analytics Dashboard to identify areas for business improvement. For example, if "wait time" is a common topic in negative reviews, consider adjusting your staffing or processes to address this issue.
To access the Analytics Dashboard:
- Click on the "Analytics" tab in the main navigation
- Select the date range you want to analyze
- Choose the specific business location if you have multiple connected businesses
- Explore the different analytics sections by clicking on the tabs
Screenshot: Full Analytics Dashboard overview
Account Management
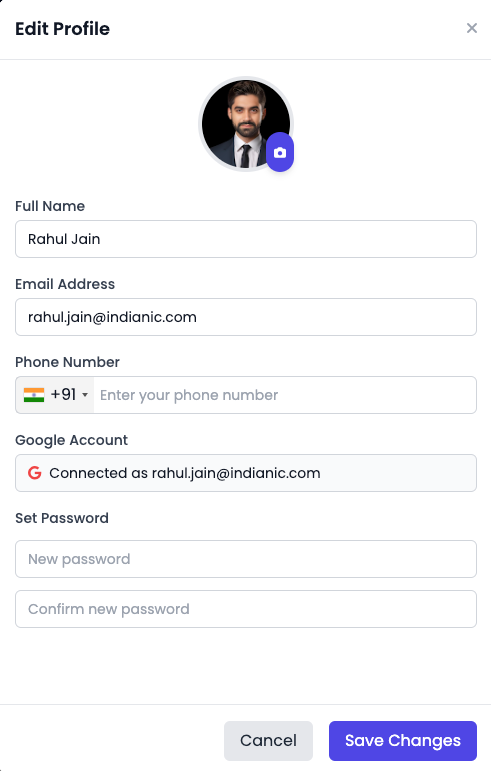
Profile Settings
Manage your personal profile information and account settings:
- Click on the "Account" tab in the main navigation
- Select "Profile Settings" from the submenu
- Update your name, email, password, or profile picture
- Click "Save Changes" to apply your updates
Screenshot: Profile settings page
Billing and Subscription
Manage your subscription plan and billing information:
- Navigate to the "Account" tab
- Select "Billing & Subscription" from the submenu
- View your current plan details and billing history
- Update payment methods or billing information
- Upgrade or downgrade your subscription plan
Upgrading Your Plan
- Click "Upgrade Plan" on the Billing page
- Select your desired plan
- Review the new pricing and features
- Confirm the upgrade
Updating Payment Method
- Click "Payment Methods" on the Billing page
- Select "Add New Payment Method"
- Enter your card or payment details
- Set as default if desired
Note: When downgrading your plan, the changes will take effect at the end of your current billing cycle. You'll continue to have access to your current plan features until then.
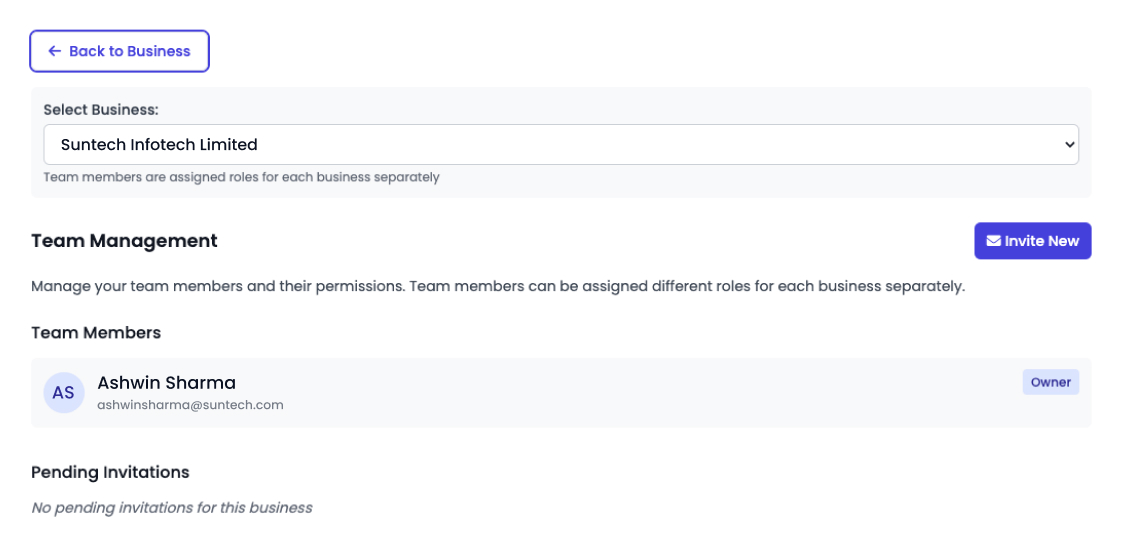
Team Management
Manage team members who have access to your ReviewMaster AI account:
| Role | Permissions |
|---|---|
|
Admin
|
Full access to all features, including billing, team management, and settings
|
|
Manager
|
Can view and respond to reviews, access analytics, but cannot modify billing or team settings
|
|
Responder
|
Can only view and respond to reviews, no access to analytics or settings
|
To manage your team:
- Navigate to the "Account" tab
- Select "Team Management" from the submenu
- View current team members and their roles
- Invite new team members or modify existing permissions
- Remove team members who no longer need access
Settings and Configuration
ReviewMaster AI offers various settings to customize your experience. Access the Settings section by clicking on the "Settings" tab in the main navigation.
AI Configuration
Customize how the AI generates responses to reviews:
AI Response Settings
Pro Tip: Create custom response templates with placeholders like reviewer_nameand business_name to personalize your AI-generated responses.
Business Configuration
Manage settings for your connected businesses:
Business Settings
Review Checking Frequency
Configure how often ReviewMaster AI checks for new reviews:
Auto-Reply Settings
Configure automatic responses to reviews:
Important: While auto-replies can save time, we recommend reviewing responses to negative reviews before sending them to ensure they appropriately address the customer's specific concerns.
Frequently Asked Questions
The number of Google Business Profiles you can connect depends on your subscription plan:
- Free Plan: 1 business location
- Basic Plan: Up to 3 business locations
- Professional Plan: Up to 10 business locations
- Enterprise Plan: Unlimited business locations
Currently, ReviewMaster AI is optimized for Google Business Profile reviews. We're actively working on adding support for other review platforms such as Yelp, TripAdvisor, and Facebook in future updates. Stay tuned for announcements about new platform integrations.
ReviewMaster AI uses advanced natural language processing to analyze the content of each review, including sentiment, specific mentions, and customer satisfaction level. It then generates personalized responses based on:
- The star rating of the review
- Specific topics mentioned in the review
- Your selected tone and language preferences
- Best practices for review responses
- Your business information and context
You can always edit the AI-generated responses before posting them to ensure they perfectly match your brand voice.
Yes, ReviewMaster AI takes data security very seriously. We use industry-standard encryption and security practices to protect your account information. We only request the minimum necessary permissions to access your Google Business Profile reviews and never store your Google password. All data transfers are encrypted using HTTPS, and we comply with GDPR and other privacy regulations.
Yes, you can cancel your subscription at any time from the Account > Billing & Subscription section. When you cancel, you'll continue to have access to your current plan features until the end of your current billing cycle. After that, your account will revert to the Free plan with limited features.
Analytics data is updated in real-time as new reviews come in. Historical trends, sentiment analysis, and topic discovery are processed daily. Competitor benchmarking data is updated weekly to ensure you have the most accurate comparison with businesses in your area.
If you try to connect a Google Business Profile that's already connected to another ReviewMaster AI account, you'll see an error message. This is to prevent multiple users from managing the same business profile simultaneously, which could lead to confusion and conflicting responses. If you believe you should have access to this business, you can contact the current account owner or reach out to our support team for assistance.
Troubleshooting
Encountering issues with ReviewMaster AI? Here are solutions to common problems:
Google Business Profile Connection Issues
"Unable to connect to Google Business Profile" error
This error typically occurs when:
- You're not logged into the correct Google account
- You don't have owner or manager permissions for the business profile
- The Google API is temporarily unavailable
Solution:
- Verify you're logged into the correct Google account
- Check your access level in Google Business Profile (must be Owner or Manager)
- Try again in a few minutes if the issue persists
- Clear your browser cache and cookies, then try again
"Business already connected to another account" error
This occurs when another ReviewMaster AI user has already connected this business profile.
Solution:
- Contact the person shown in the error message (typically the business owner)
- Ask them to add you as a team member to their ReviewMaster AI account
- If you believe this is an error, contact our support team with proof of ownership
Connected business not showing reviews
If your business is connected but no reviews are appearing:
Solution:
- Verify the business actually has reviews on Google
- Try disconnecting and reconnecting the business
- Check if you've applied filters that might be hiding reviews
- Wait 15-30 minutes for the initial sync to complete
AI Response Generation Issues
AI responses not generating
If the AI isn't generating responses when requested:
Solution:
- Check your subscription plan limits (Free plan has limited AI generations)
- Verify your internet connection is stable
- Try refreshing the page
- Wait a few minutes and try again (our AI service might be experiencing high demand)
AI responses not relevant to the review
If the AI is generating responses that don't seem to address the review content:
Solution:
- Try regenerating the response
- Update your business description in Settings to provide more context
- Create custom response templates for different review types
- Manually edit the response before sending
Account and Billing Issues
Payment method declined
If your payment method is being declined:
Solution:
- Verify your card details are correct
- Check if your card has expired
- Contact your bank to ensure they're not blocking the transaction
- Add a different payment method
Unable to access premium features
If you've upgraded but can't access premium features:
Solution:
- Verify your payment was processed successfully
- Check your Account > Billing page to confirm your current plan
- Try logging out and logging back in
- Clear your browser cache and cookies
- Contact support if the issue persists
Still having issues? If the troubleshooting steps above don't resolve your problem, please contact our support team for personalized assistance.
Getting Help and Support
Need additional help with ReviewMaster AI? We offer several support channels to ensure you get the assistance you need.
Help Center
Browse our comprehensive knowledge base with articles, tutorials, and guides on using ReviewMaster AI effectively.
Visit Help CenterEmail Support
Contact our support team directly for personalized assistance with your specific questions or issues.
support@reviewmaster.aiLive Chat
Chat with our support team in real-time during business hours for immediate assistance with urgent issues.
Video Tutorials
Watch step-by-step video guides demonstrating how to use all features of ReviewMaster AI effectively.
Watch TutorialsSupport Hours
Email Support
24/7 - Response within 24 hours
Live Chat
Monday - Friday: 9am - 8pm EST
Saturday: 10am - 6pm EST
Sunday: Closed
Priority Support
Professional and Enterprise plan subscribers receive priority support with faster response times and dedicated support specialists.
Feedback and Feature Requests
We're constantly improving ReviewMaster AI based on user feedback. Have a suggestion or feature request? We'd love to hear from you!
Ready to Get Started?
Now that you've learned how to use ReviewMaster AI, it's time to start managing your reviews more effectively and growing your business with AI-powered insights.